October 20, 2026
How to Maintain Your Basement Waterproofing System Over Time
By @rylanikoa427
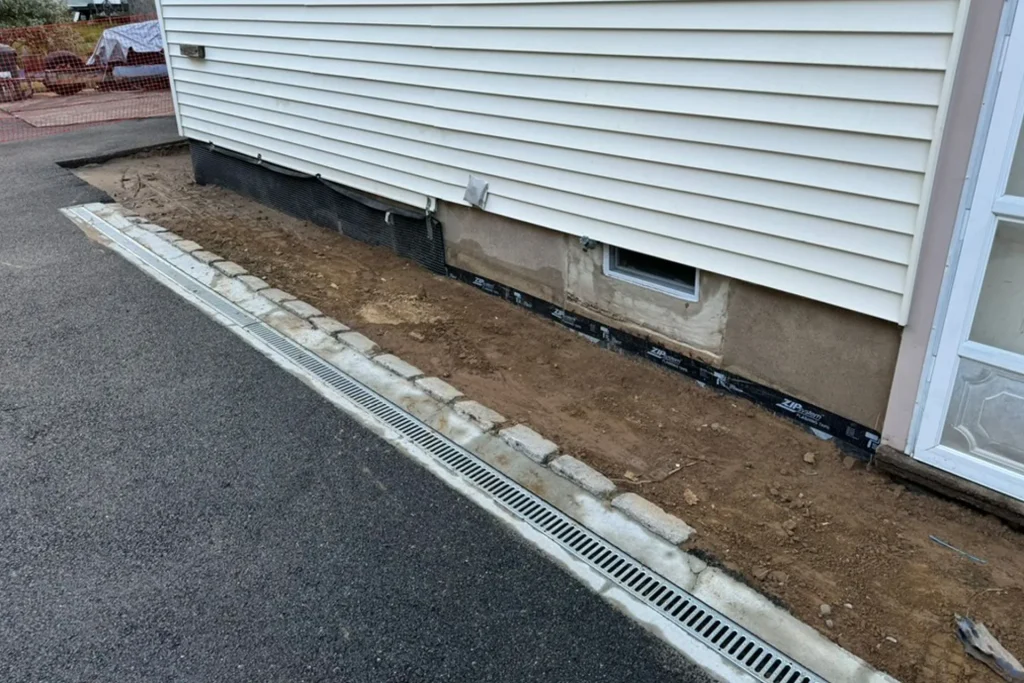
A basement waterproofing system is not a one-time fix you install and forget. Even a well-designed system needs regular attention if you expect it to keep water out year after year. I have seen basements stay bone dry for decades with ordinary upkeep, and I have also seen expensive systems fail early because small warning signs were ignored. A clogged discharge line, a jammed float switch, a downspout dumping too close to the foundation, any one of those can undo a lot of good work.
The challenge is that water problems rarely announce themselves all at once. They build slowly. A little efflorescence on the wall. A faint musty smell after heavy rain. A sump pump that sounds different than it did last spring. Homeowners often notice these things, then put them off because the basement still looks mostly fine. By the time puddles appear, the repair is usually more involved and more expensive than it needed to be.
Good maintenance is less about technical complexity and more about consistency. Most of the work is basic inspection, cleaning, testing, and paying attention to changes in how your system behaves. If you know what your basement waterproofing setup includes and what each part is supposed to do, you can catch problems early and avoid the familiar cycle of emergency calls during storms.
Know what kind of system you actually have
Before you can maintain anything properly, you need a clear picture of what is installed in your house. “Basement Waterproofing” can describe several very different approaches, and maintenance depends on the details. Some homes rely mostly on exterior drainage improvements, such as grading, downspout extensions, and membrane protection on foundation walls. Others have an interior perimeter drain that collects water under the slab and carries it to a sump basin. Some have both, which is common in homes with a history of seasonal groundwater pressure.
You may also have wall vapor barriers, a dehumidifier, window well basement waterproofing contractors drains, a backwater valve, or a battery backup for the sump pump. In finished basements, parts of the system may be hidden behind drywall or built-ins, which makes records especially important. If you hired a contractor, keep the installation documents. If you bought the house with the system already in place, spend an afternoon tracing what you can see and making notes.
A simple sketch helps more than most people expect. Mark the sump pit, discharge line route, cleanout access points if any exist, downspout locations, window wells, and any area where water has appeared before. When something changes later, that sketch becomes a useful reference. It also saves time if you ever need a contractor to diagnose a recurring issue.
Water usually starts outside
People tend to focus on the sump pump because it is the visible machine in the system, but many basement moisture problems start with poor exterior water management. If too much roof runoff and surface water collect near the foundation, your interior system works harder than it should. That shortens component life and increases the chance of failure during peak storms.
Walk the perimeter of the house during or right after a hard rain. This is one of the most useful inspections you can do. You will learn more in twenty minutes of wet weather than you will from staring at a dry basement floor in August. Look for overflowing gutters, downspouts that leak at the joints, water pooling near the house, settled areas in the soil, and splash blocks that have shifted out of place.
The ideal grading slopes away from the house enough to move water off the foundation area, not just an inch or two and then a dip. In the real world, settled backfill often creates a shallow trough next to the wall, especially a few years after construction. That depression collects runoff exactly where you do not want it. A load or two of compacted clay-rich fill can make a meaningful difference. Topsoil alone is not always enough because it settles and washes more easily.
Downspout extensions matter more than they get credit for. A short elbow that drops roof water at the base of the wall is better than nothing, but not by much. In many cases, getting that water 6 to 10 feet away from the foundation is far safer, provided the discharge point does not send it toward a neighbor or back onto a walkway that ices in winter. Every site has trade-offs. Tight urban lots, sidewalks, patios, and property lines can limit your options, which is one reason buried drain lines are common. If you have buried lines, they need periodic checking too. They clog, crush, disconnect, and freeze.
The sump pump deserves scheduled attention
If your basement waterproofing system includes a sump pump, that pump is your last active line of defense. It should not be treated like an appliance you notice only when it breaks. Test it on a schedule, not just before a storm when everyone else is doing the same thing and local service companies are booked solid.
A pump test is straightforward. Remove the pit cover if needed, look inside with a flashlight, and check for debris. Then slowly add enough water to lift the float and trigger the pump. Watch the full cycle. The pump should start promptly, discharge strongly, and shut off cleanly once the water level drops. If it hesitates, chatters, hums without pumping, or runs longer than usual, do not shrug it off.
Many problems show up first as sound changes. A pump that used to have a steady, confident tone may start rattling because the impeller is wearing or debris is interfering. A louder thump at shutoff can point to a check valve issue. A weak discharge flow may mean a partial blockage in the line, not necessarily a bad pump. The distinction matters because replacing a good pump will not solve a restricted drain line.
Here is a practical maintenance rhythm that works for most homes:
- Test the sump pump every three to four months, and also before the wettest season in your area.
- Clean sediment or debris from the pit as needed, especially if fine silt tends to wash in.
- Inspect the discharge line and exterior outlet for blockage, ice risk, or animal nesting.
- Confirm the check valve is oriented correctly and not leaking back into the pit.
- Replace aging pumps proactively when performance declines, rather than waiting for failure during a storm.
Pump lifespan varies widely. Some quality units last close to a decade under moderate use, while others wear out in five years or less if they cycle often, handle silty water, or were undersized from the start. Frequent cycling is hard on a pump. If your pit fills and empties in very short intervals during wet weather, that is worth investigating. It could indicate a switch issue, a small pit, a high water table, or excessive water loading from outside.
Battery backup systems deserve their own checks. A backup pump can save a basement during a power outage, but only if the battery is healthy and the charger is working. I have seen homeowners proudly mention their backup system, then discover the battery had been dead for months. Follow the manufacturer’s testing guidance, but at minimum confirm the charging indicators are normal and the backup engages properly. Batteries have finite service lives. Mark the installation date where you can see it.
Interior drains need to stay open and functional
An interior perimeter drain or channel system is built to collect water before it rises through the slab or pushes through the wall-floor joint. Because much of it is hidden, people assume there is nothing to maintain. That is partly true and partly risky.
The drain path itself is often fairly low-maintenance when properly installed, but its access points, sump connection, and surrounding conditions still matter. If the system includes cleanouts, do not bury or block them behind storage. If there is visible seepage at one area of the basement that seems inconsistent with the rest of the system, that can mean a section is obstructed or not receiving water the way it should. In older homes, iron bacteria or mineral buildup can also complicate drainage over time.
Watch the wall-floor joint and the perimeter edge after heavy rain. If water starts appearing in a new spot, or if one section looks damp long after the rest has dried, treat that as a clue. Sometimes the issue is not a failed drain at all, but a hidden source such as a cracked window well drain, a disconnected downspout line outside, or condensate from HVAC equipment. The point is not to jump to conclusions. It is to investigate while the symptom is still small.
Dehumidification is part of the system, even if it was not sold that way
A basement can be technically waterproofed and still feel damp. Liquid water and air moisture are related but not identical problems. If you keep bulk water out but allow humidity to stay high, you still create conditions for mold growth, musty smells, swollen trim, and rust on tools or appliances. In many basements, especially finished ones, dehumidification is an essential part of long-term maintenance.
A good basement dehumidifier should drain continuously if possible. Buckets fill at the worst times, usually when no one is home. Keep the filter clean and verify the drain hose or condensate pump is working. If the unit runs constantly but humidity remains high, check whether the space is too large for its capacity or whether outside air is entering through leaky windows, poorly sealed rim joists, or open vents that should not be open in a humid season.
Relative humidity under about 50 to 55 percent is a practical target in many basements, though local climate and seasonal conditions matter. The goal is not to chase a perfect number. The goal is to avoid the sticky, stale environment where surfaces never seem to fully dry. A small digital hygrometer costs little and gives you a baseline. Without one, people tend to judge by feel, and feel is unreliable.
Window wells, basement stairs, and overlooked entry points
Some of the most frustrating basement leaks come through locations homeowners do not associate with the main waterproofing system. Window wells are a common example. A window well can collect leaves, mulch, roof runoff, and windblown debris until the drain clogs. Then one hard storm turns it into a bucket pressed against the window. Even a good window can leak when submerged.
Keep wells clean, especially in fall and after landscaping work. Make sure the soil around them still slopes away and that any covers are intact and secured. Covers are not perfect, but they reduce debris and direct rainfall considerably. If a well drain ties into the foundation drainage system, remember that both parts have to remain functional for the setup to work.
Exterior basement stairwells are another trouble spot. The drain at the bottom often clogs with grit and leaves. Water then ponds against the basement door threshold. I have seen homeowners replace the door weatherstripping twice before realizing the actual problem was a blocked stair drain and a broken gutter above the stairs. Water follows the simplest path available. Your maintenance habits should reflect that.
Plumbing penetrations, utility line entries, and cracks around old patch repairs are worth a seasonal look too. Not every crack leaks, and not every damp mark means structural trouble, but changes matter. A previously dry crack that starts showing moisture deserves prompt attention. Sealants have limits. If hydrostatic pressure is driving water through the foundation, surface patching alone rarely solves it for long.
Seasonal changes can stress the system
Basement waterproofing systems do not operate under the same conditions year-round. Spring snowmelt, summer thunderstorms, autumn leaf buildup, and winter freeze cycles each create their own maintenance demands.
Spring is the time when many hidden issues reveal themselves. The ground is saturated, the water table may be high, and pumps work harder. If your basement has a history of trouble, test everything before this season, not during it. Summer can bring short but intense cloudbursts that overwhelm clogged gutters or undersized discharge setups. Fall is when leaves and seed pods block drains and gutters. Winter creates risks for frozen discharge lines, especially where the outlet is poorly sloped or buried by snow.
This is where experience matters more than general advice. A house on a hill with fast-draining soil behaves differently from a house on flat clay. A century home with a stone foundation behaves differently from a newer poured concrete foundation. Some basements stay dry most of the year but struggle during one predictable six-week period. If that is your house, build your maintenance calendar around the problem season rather than a generic annual reminder.
Warning signs that should never wait
Some changes are annoying but manageable. Others suggest you need professional help soon. The biggest mistakes usually come from assuming a wet basement symptom is “just humidity” or “just an old house thing” when the pattern has clearly shifted.
Pay close attention to these signs:
- The sump pump runs continuously or cycles unusually often without an obvious weather reason.
- Water appears above the wall-floor joint, not just at the perimeter edge.
- New cracks form, or existing cracks widen and begin leaking.
- Musty odors intensify despite normal humidity control.
- The discharge line sends water back toward the house or seems to stop flowing during pump operation.
Continuous pump operation may indicate a stuck float, a failed check valve, a broken discharge line, or unusually high groundwater. Water appearing higher up the wall can point to a different entry path than your main perimeter system is designed to handle. Strong odors can indicate hidden mold growth behind finished walls, which is not something you want to ignore for another season.
Finished basements hide trouble longer
An unfinished basement usually tells the truth. You can see damp spots, staining, and seepage paths. A finished basement is more deceptive. Carpet, insulation, framing, and wall coverings can hold moisture quietly until the damage becomes extensive. By then, what might have been a drainage adjustment turns into demolition and remediation.
If your basement is finished, do periodic checks around the perimeter. Look at baseboards, corners, and flooring transitions. Press lightly on suspicious trim. Warping, staining, or a faint softness can signal moisture behind the surface. Pay attention to smells after rain, not just to visible water. If one room feels cooler and damper than the rest, that is worth tracing.
It also helps to be careful with storage. Cardboard boxes, fabric, and paper goods stacked directly against exterior basement walls make inspection harder and absorb moisture quickly. Even if your basement has stayed dry for years, leave some access to the perimeter and keep vulnerable items elevated. It is a simple habit that can save a lot of damage if a problem develops between inspections.
Documentation makes future maintenance easier
Homeowners who keep records tend to spend less over time because they notice patterns. Write down the date when you test the sump pump, replace a battery, clear a downspout line, regrade a problem area, or see dampness after a storm. Include a note about the weather if it seems relevant. Was it a day-long soaking rain, a fast thunderstorm, or a thaw after heavy snow?
After a few seasons, patterns emerge. You may notice the west wall gets damp only during wind-driven storms, or the pump cycles hardest after two consecutive wet days, not after a single heavy downpour. That kind of pattern recognition is valuable. It helps you distinguish a one-off event from a system problem, and it gives any contractor you hire a much better starting point.
Photos help too. Take a picture of the sump pit, discharge outlet, window wells, and any area of concern when things are normal. Then if something changes, you are not relying on memory. Memory in basement work is often misleading. People forget whether that stain was always there or whether the grading looked that flat last year.
When maintenance is not enough
There are times when good upkeep cannot compensate for an undersized or poorly designed system. If your pump works constantly in ordinary weather, if water enters through multiple pathways, or if the basement was “fixed” repeatedly with sealers and patch products that never addressed exterior drainage, you may need a more comprehensive evaluation.
That does not always mean a full replacement. Sometimes a relatively modest correction solves the issue, such as extending downspouts farther, adding a larger sump basin, installing a backup pump, separating a footing drain from a clogged discharge route, or improving grading along one problem side of the house. Other times, especially in homes with chronic hydrostatic pressure or old foundations with mixed repairs, the answer is more involved.
The important thing is to resist the urge to chase symptoms one tube of caulk at a time. Waterproofing failures are often systems problems. If you only patch the visible leak, the water usually finds another route.
The long view pays off
A dry basement is rarely the result of one heroic repair. More often, it comes from a series of ordinary maintenance habits done on time. Clean the gutters before they overflow. Test the pump before storm season. Keep the discharge line open. Watch the grading. Pay attention to odors and small damp spots before they become obvious leaks.
That kind of care is not glamorous, but it works. Basement Waterproofing performs best when the entire chain is functioning, from roof runoff management to drainage to pumping to humidity control. When one link weakens, the basement often tells you, quietly at first. If you listen early, the fixes stay manageable. If you wait, water usually gets the last word.
ARD Waterproofing
98 Smull Ave, West Caldwell, NJ 07006, United States
+1 917-691-8411
FAQ About Basement Waterproofing
Can you 100% Waterproof a Basement in West Caldwell?
A properly designed system can substantially reduce basement water intrusion, but no method can promise protection against every flood, equipment failure, or future change in site conditions. The first step is identifying whether moisture comes from surface runoff, groundwater, plumbing, or condensation. Solutions may include grading and gutter improvements, drainage, foundation repairs, and a sump system. Review the specific coverage and exclusions of any written warranty.
How much does it cost to professionally waterproof a basement in NJ?
There is no single price that fits every basement. Cost depends on the cause of the leak, the area needing work, access, excavation requirements, drainage design, sump equipment, and restoration of disturbed finishes or landscaping. Request an on-site assessment and an itemized written estimate that explains the scope, exclusions, and maintenance requirements before comparing proposals.
How long does foundation waterproofing last in West Caldwell, NJ?
Service life varies with the waterproofing materials, installation quality, soil and water conditions, and maintenance. Drainage components and pumps may require servicing or replacement even when other parts of the system remain functional. Keep gutters, drainage outlets, and sump equipment maintained, and have recurring leaks or changes in foundation condition assessed. Ask for product-specific expectations and written warranty terms rather than relying on one lifespan for the entire system.
❧